In this article, we are going to tell you why there is no sound on your Windows 11 device and what are the possible fixes for the issue. You will find easy-to-understand, step-by-step guides to solve the issue and get the sound back on your Windows 11 PC or laptop.
Why is There No Sound on My Windows 11 Device?
Now, before moving on to the possible fixes for the no-sound issue on Windows 11, let us give you an idea of why you might not be able to hear any sound on your Windows device. There can be a plethora of reasons why you are not able to hear any sound on your Windows 11 device. It could be just that you have accidentally muted the system sounds or something more serious such as an outdated/ corrupted audio driver on your system. You can find some of the common and uncommon reasons that might cause the no-sound issue on Windows 11 listed right below. Misconfigured Audio Settings – The general audio settings of your Windows 11 device might have been accidentally misconfigured. This is one of the most common issues and can be easily fixed.
Output Device Not Connected Properly: Another common reason for the no-sound issue on Windows 11 might involve output devices not connected to your PC or laptop properly. Wrong Audio Device Selected on Windows: One of the silly mistakes from the user-end, which I also committed once, involves the wrong audio device selected on Windows settings. It can happen, especially, when you have multiple audio devices connected to your device via wired connections or Bluetooth. Audio Driver Outdated/ Corrupted/ Incompatible: One of the serious issues that you can face for the no-sound issue on Windows 11 could be outdated, corrupted, or incompatible audio drivers installed on your PC.
So now that we have covered some of the common and uncommon reasons for the no-sound issue on Windows 11, let’s move on to the fixes. For your convenience, we have categorized the fixes under the “Common Fixes” and “Advanced Fixes” headings. we would suggest you try the common fixes first and then move on to the advanced ones.
Simple Fixes for No Sound Issue on Windows 11
You can find some of the common fixes for the no-sound issue on Windows 11 listed right below. Be sure to go through them and try them out in chronological order.
1. Check Your System Volume
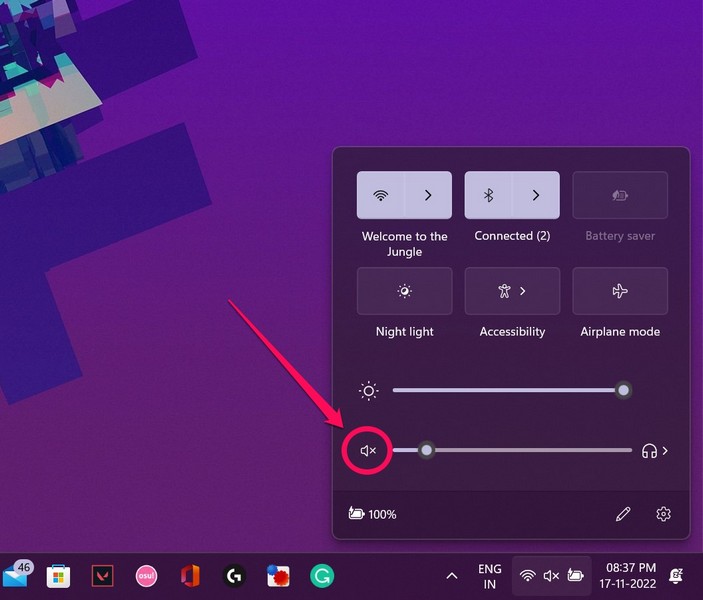
Often times users mistakenly mute their system volume and forget about it. This is one of those silly mistakes that could prevent your device to produce sound in apps or web browsers. To check if you have muted your system audio:
- Open the Action Center from the extreme right of the Task Bar or by pressing Windows + A.
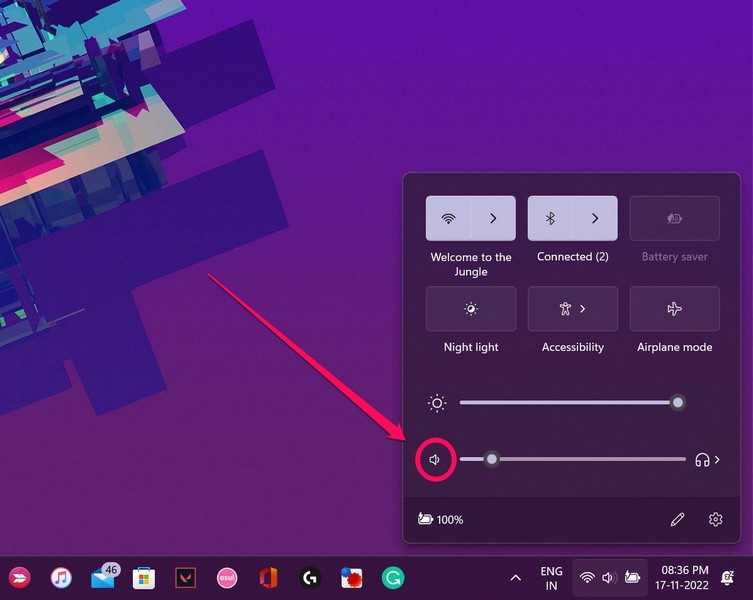
- Here, check whether the speaker icon has the cross sign or not.
- If it does, click on it to unmute the system sounds, and you should be good to go!
2. Check Your Audio Source
This is another common reason why there is no sound on your Windows 11 PC. If multiple audio devices are connected to a PC or a laptop via wired connections and/ or Bluetooth, this issue can arise. You see if you connect your AirPods to your Windows 11 device via Bluetooth and try to listen to system sounds from your laptop or external speaker set, you might not be able to do so. This is because all the audio output of your system is channeled to the connected AirPods, which you are not wearing! Now, this was just an example (well, an actual case involving me), but you get the idea, right? If your system sound is channeled to any audio source other than your default speakers, you might face the no-sound issue on Windows 11. So, to check if you have the correct audio source selected:
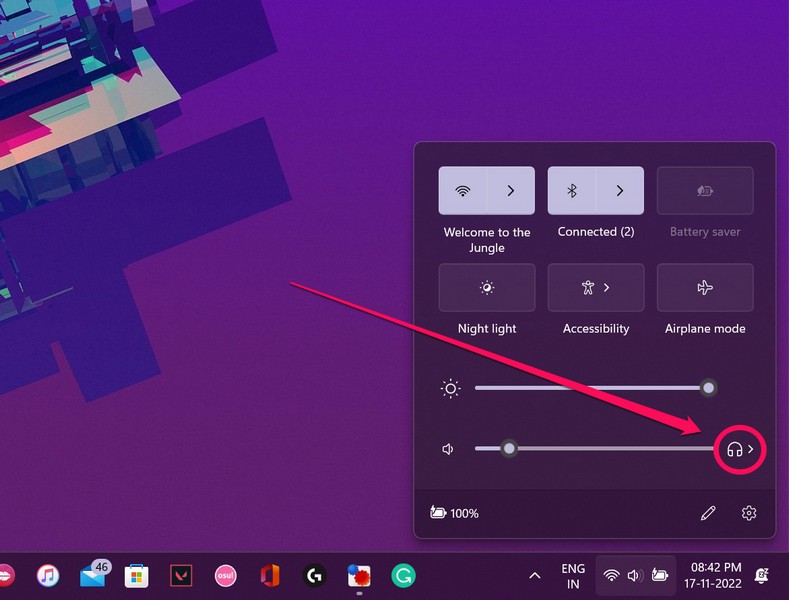
- Open the Action Center from the Task Bar or with Windows + A.
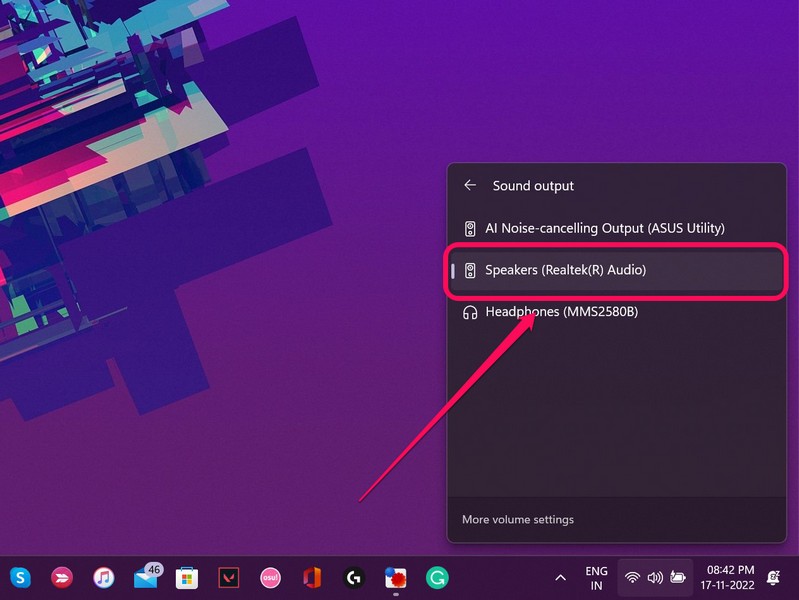
- Click on the audio icon on the right of the volume bar to view all connected audio devices.
- Here, choose your default speakers or a connected Bluetooth audio device, and you are pretty much done. This way, you can easily check if you have the right audio source selected for your system audio to prevent the no-sound issue on your Windows 11 device.
3. Check Your Windows 11 Sound Settings
If you still face the no-audio issue on your Windows 11 system, you need to check the audio settings from the Windows Sound Settings panel. to do this:
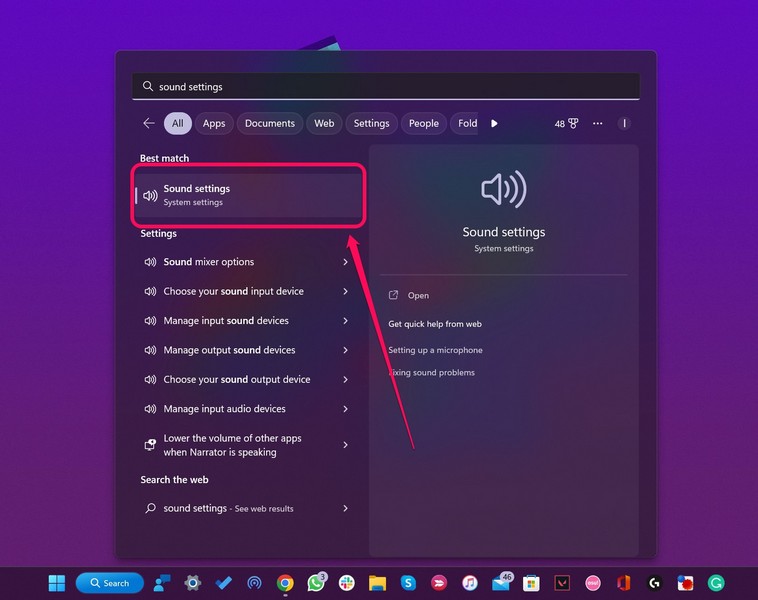
- Click on the Search icon/ bar on the Taskbar or use the search bar in the Start menu to initiate a search.
- Search for “Sound Settings” and click on the relevant result to open the audio settings.
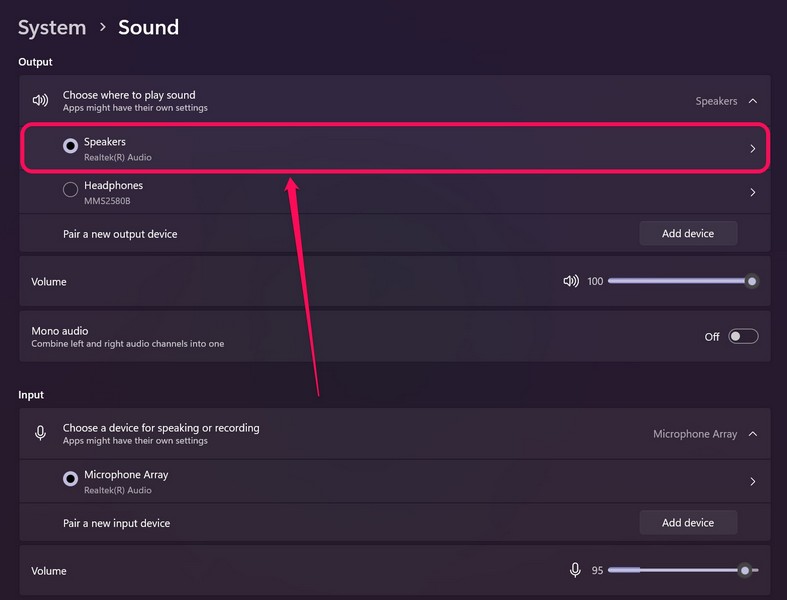
- Here, you will find all your audio devices listed. Select the one that you want to use on your device.
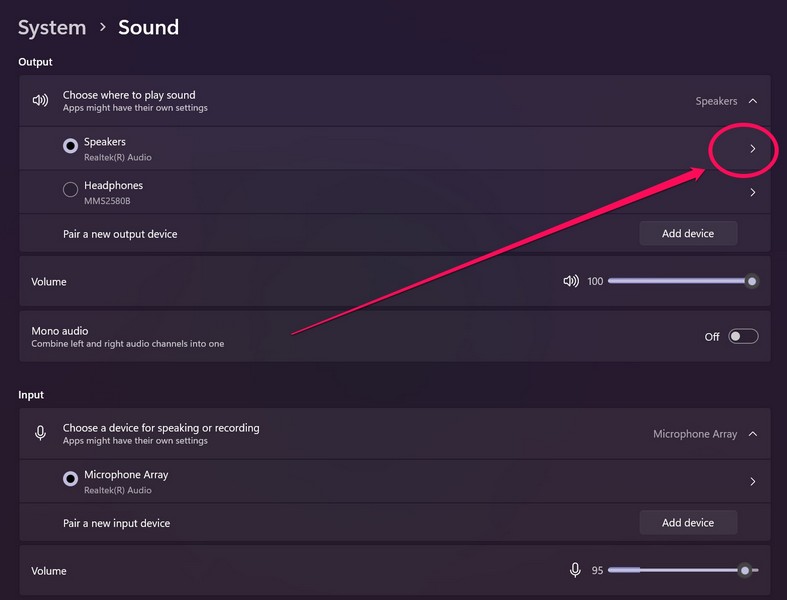
- Click the arrow button beside the selected audio source to open its properties.
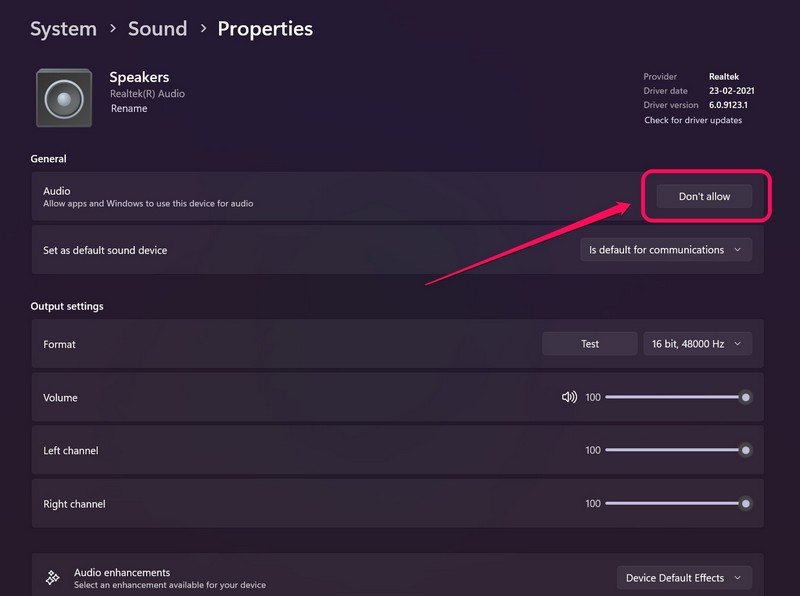
- Now, if you see the “Don’t Allow” button beside the Audio option, keep it that way. This actually means that the selected device is currently allowed to output audio for all apps and browsers on Windows 11.
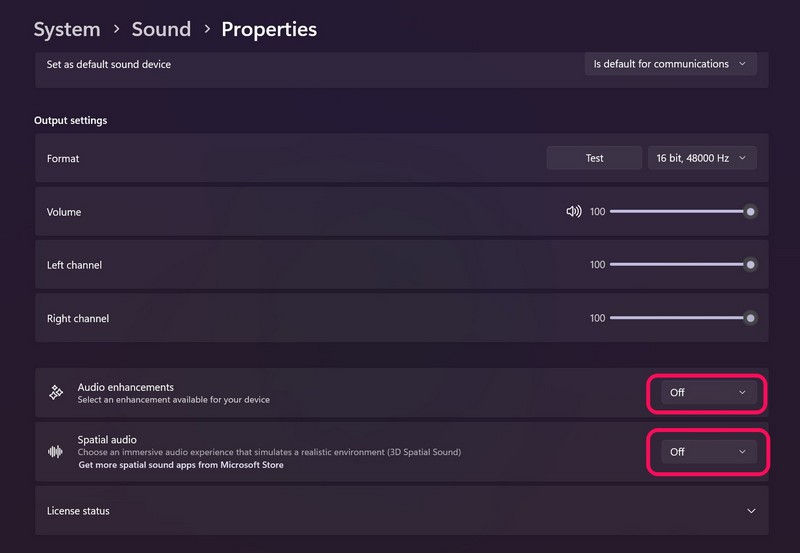
- However, if you have any Audio enhancements effect set, turn that off as it sometimes causes issues with audio output. You can also turn off the Spatial audio option as it is also known to cause audio issues for some users.
4. No Audio in Web Browsers? Try This!
Are you facing an issue on your Windows 11 system in which you are getting all the audio output for your apps and system sounds except for in Google Chrome or Microsoft Edge? If yes, first check if you have mistakenly muted the site from which you are expecting to get the audio in your web browser. To check this:
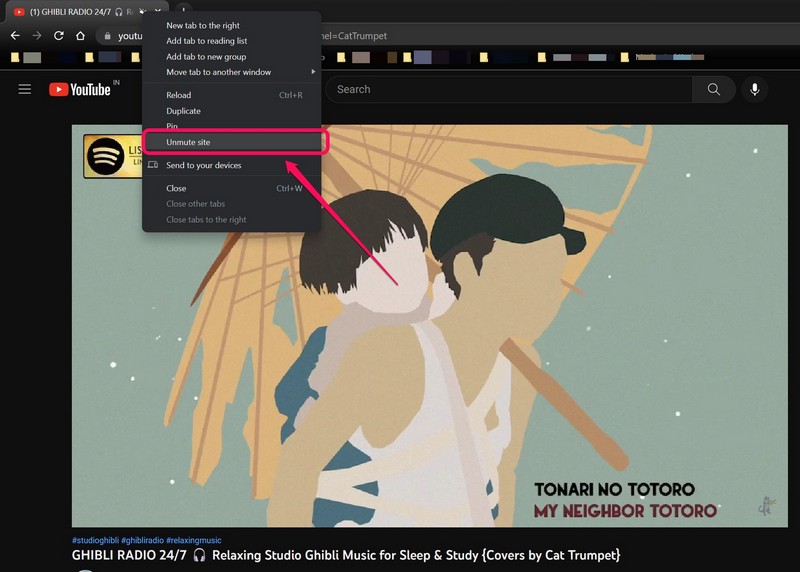
- Open the site in which you are facing the issue using Google Chrome.
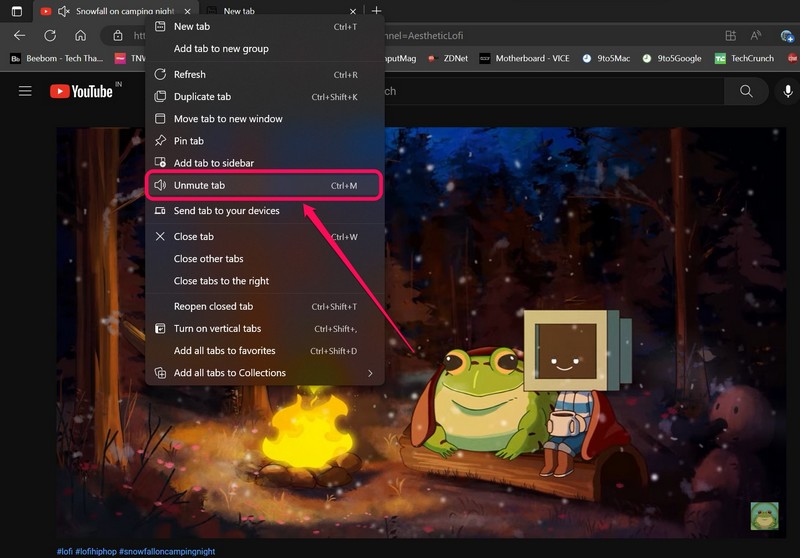
- Now right-click on the tab to open the context menu.
- Here, if you see the “Unmute site” option, click on it to unmute the selected site.
- On Microsoft Edge, you can do the same and click on the “Unmute tab” option on the context menu to unmute your desired tab. One thing to note here is that on Google Chrome, when you mute a site, it stays muted even if you close that tab and open the site in another tab. On Edge, however, only the tab gets muted and when you close the tab and reopen the site in another tab, it automatically gets unmuted. Now, having done these changes for your system, you should no longer face the no-sound issue on your Windows 11 device. However, if you are still experiencing the same, let’s move on to the advanced steps.
Advanced Fixes for No Sound Issue on Windows 11
Below, you can find some of the advanced fixes for the no-audio issue on Windows 11. Check them out only if the above common fixes fail to resolve your audio issue.
1. Restart the Windows Audio Service Manually
The Windows Audio Service is a system service that handles every audio-related operation on your device. So, restarting this should resolve any technical issue with the audio of your system. To do it:
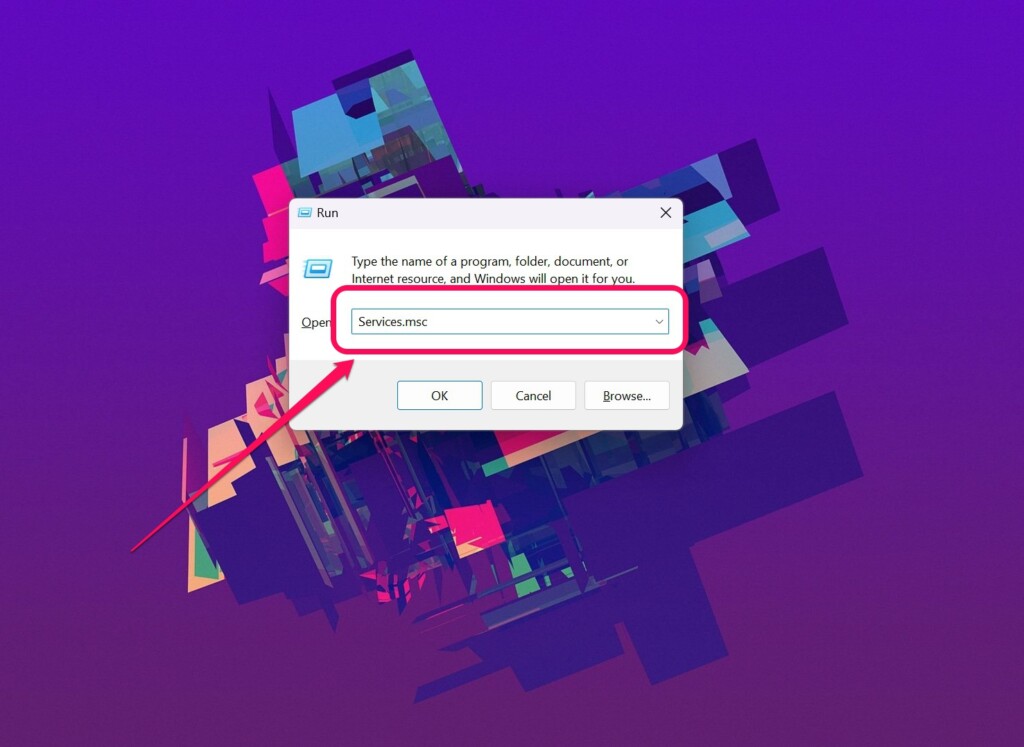
- Press Windows + R to open the Run Tool on your Windows 11 device.
- In the text field, type “services.msc” and click Enter.
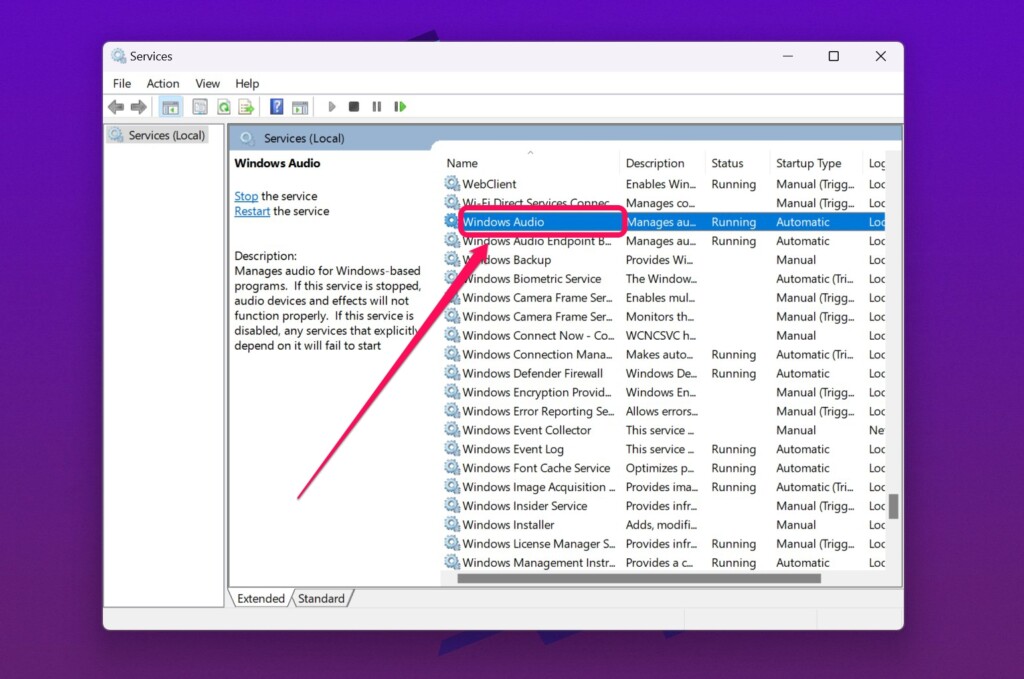
- In the Windows Services window, look for the “Windows Audio” option and double-click on it to open.
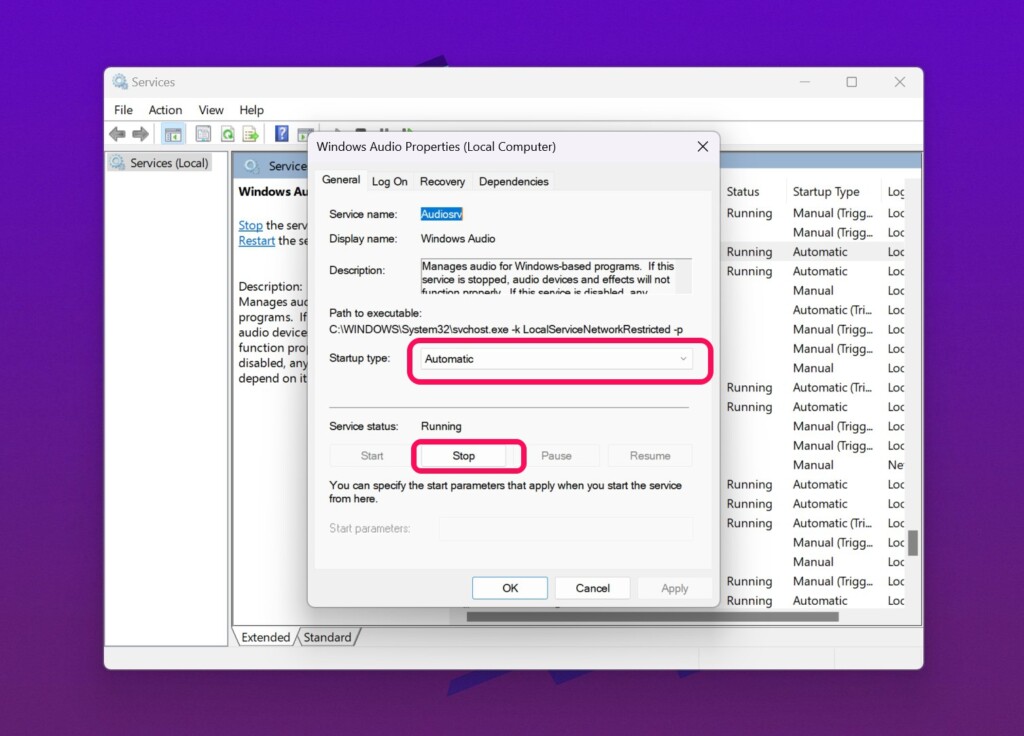
- Now, on the Windows Audio pop-up window, click on the Stop button to manually stop the audio services.
- Set the “Startup Type” option as “Automatic” if it is not set to that already.
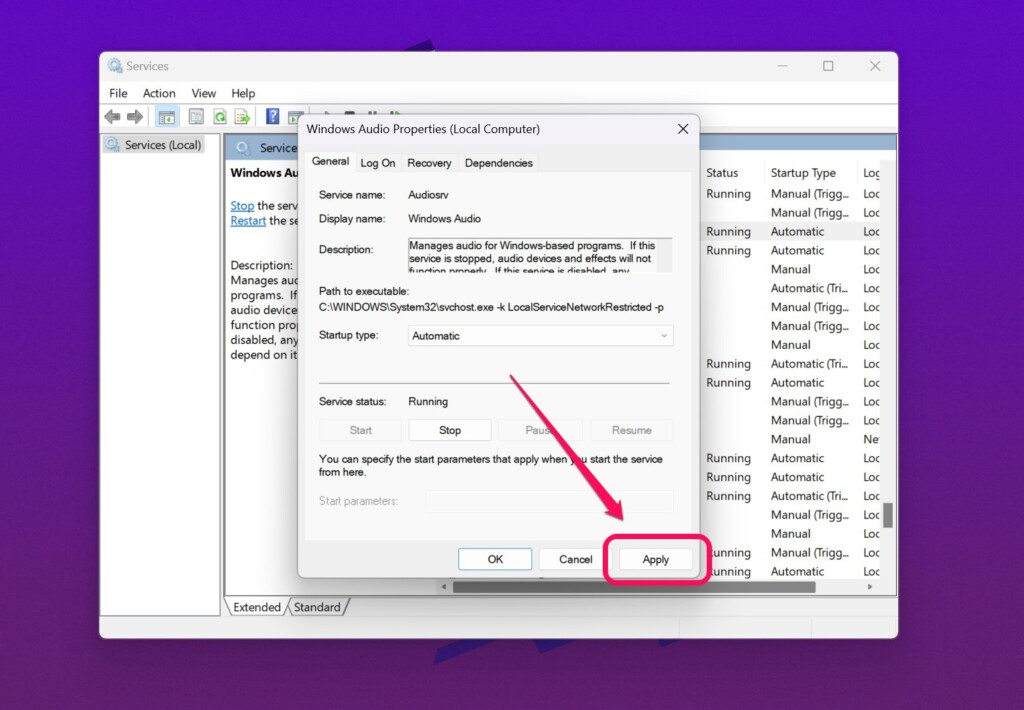
- Then click the “Apply” button below to save the changes.
- Now, restart your PC and check whether the no-sound issue on your device is fixed or not.
2. Update Your Audio Driver
If restarting the audio service did not fix your audio issue on Windows 11, you can try updating the audio driver. This essentially replaces outdated audio drivers, which might be causing the no-sound issue on your Windows device, with the latest version. However, for this, you need to be connected to the internet for Windows to download and install the latest audio driver on your system. To update the audio driver on Windows 11:
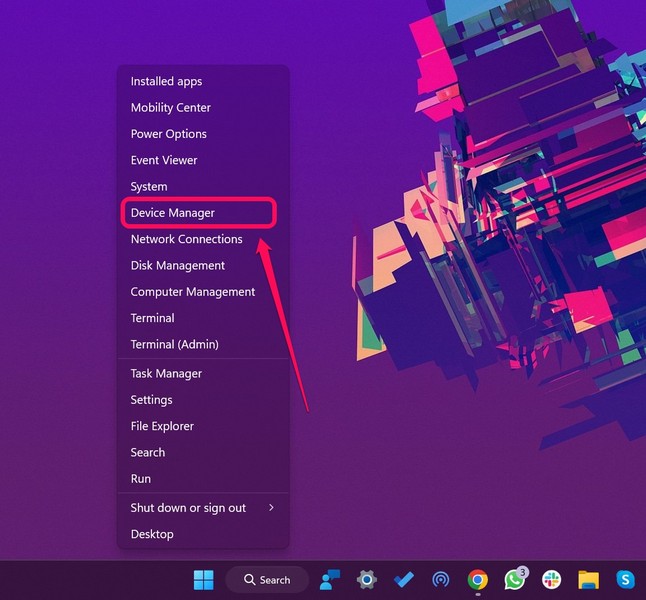
- Right-click on the Start icon or press the Windows + X shortcut to open the Quick Links menu.
- Select the “Device Manager” manager option.
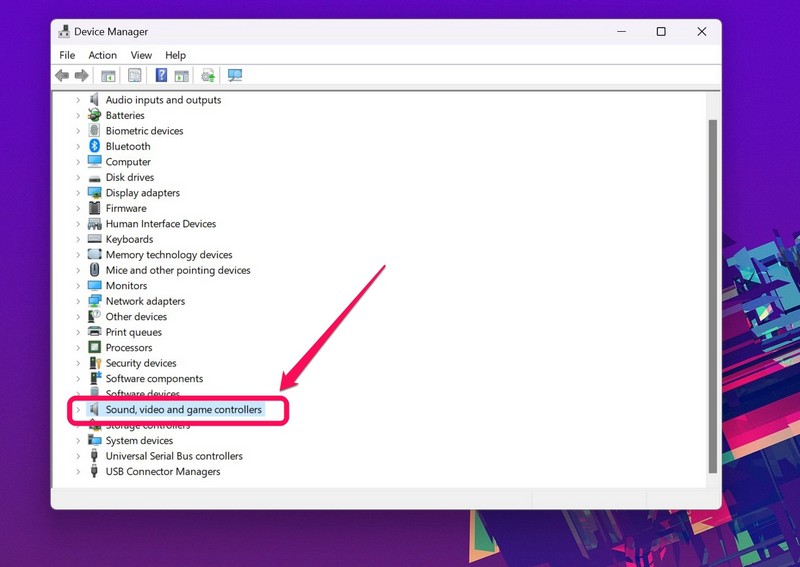
- Now, click on the arrow beside the “Sound, video and game controllers” option to expand it.
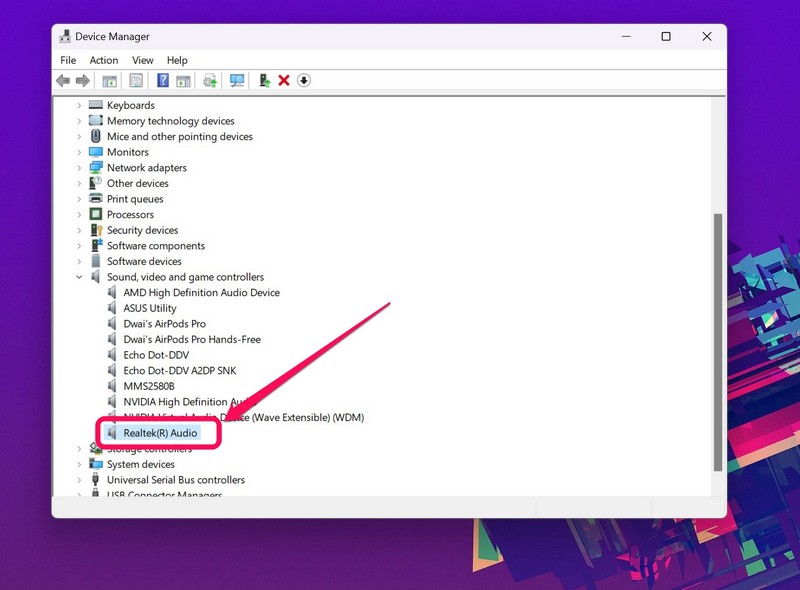
- Find your audio driver from the list and right-click on it. It should be named Realtek Audio or something similar, depending on the sound card of your PC.
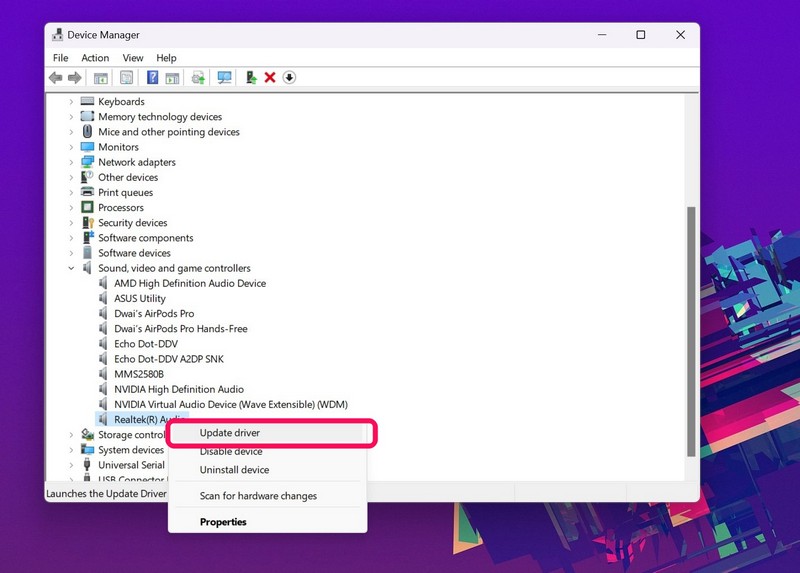
- Click the “Update driver” option on the context menu.
- Then, follow the on-screen instructions to update your audio driver.
- Following the update, restart your PC.
3. Reinstall Your Audio Driver
If updating your audio driver did not help resolve the no-sound issue on Windows 11, you can now try uninstalling the audio driver on your PC or laptop and reinstalling it. To do this:
- Open the “Device Manager” on your Windows 11 device.
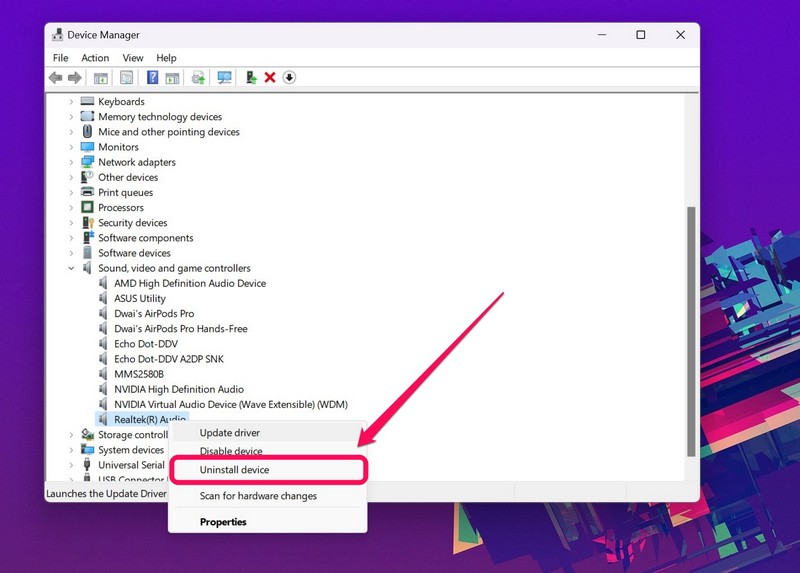
- Expand the “Sound, video and game controllers” menu by clicking the arrow beside it. Right-click on your audio driver.
- Click the “Uninstall device” option on the context menu. Doing this will uninstall the audio driver on your Windows 11 device. To re-install it, simply restart your system and Windows will automatically install the driver following the restart. If this fix also does not work for you, move on to the next and final one.
4. Use the Windows Troubleshooter to Fix No-Sound Issue
Now, if all the above fixes for the no-sound issue on Windows 11 fail for your device, it is time to use the system troubleshooter. With Windows 11, Microsoft has provided dedicated troubleshooter tools for users to easily troubleshoot and resolve various system issues, including audio issues. So, you can use Window 11’s “Playing Audio” troubleshooter to check for bugs that might be causing the no-audio issue on your system and fix them instantly. To access the audio troubleshooter, follow the steps right below.
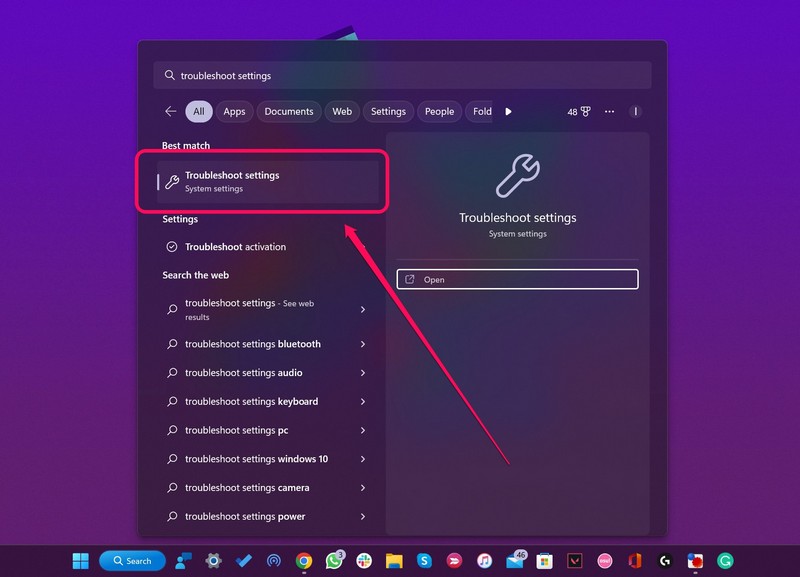
- Click the search icon/ bar on your Windows 11 home screen and search for “Troubleshoot settings.”
- Click on the relevant result to open the system troubleshooting window.
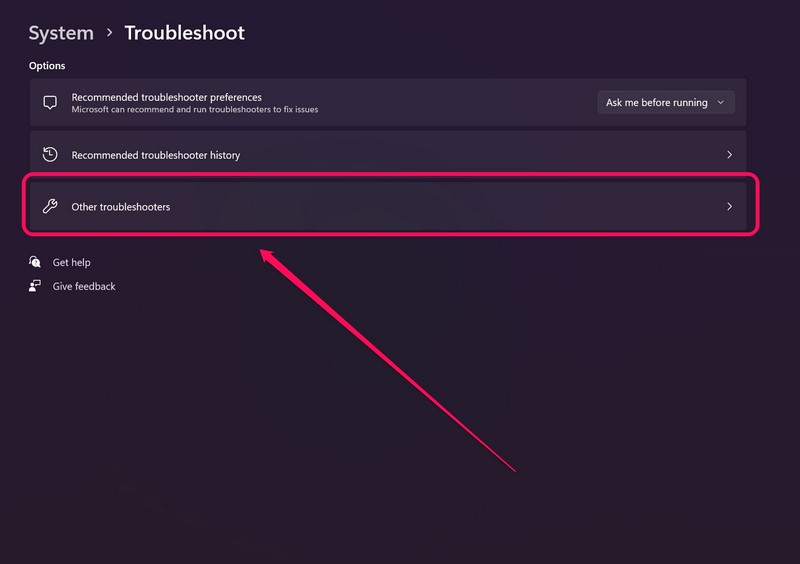
- Click on the “Other troubleshooters” option at the bottom.
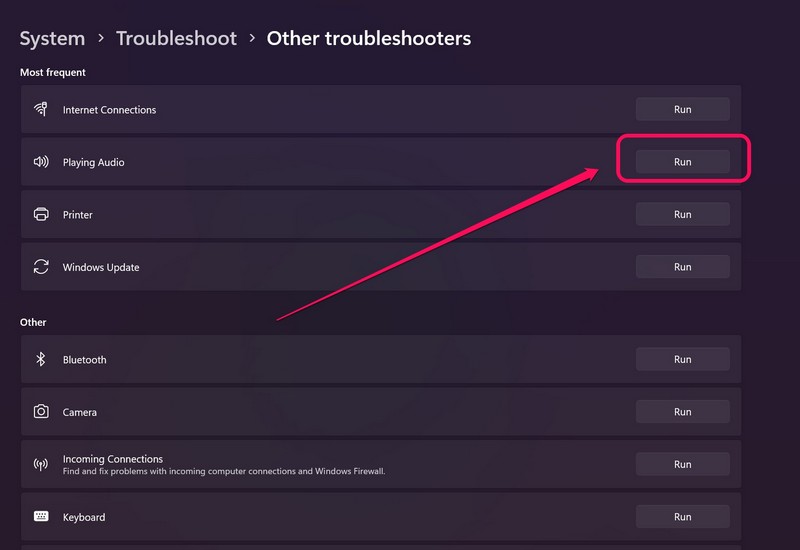
- Here, click the “Run” button beside the “Playing Audio” option. The playing-audio troubleshooter will run a series of tests and inspections to detect any issue that is causing the no-sound issue on your Windows 11 device. It will also try to fix the issue automatically if the solution is available online. Otherwise, the troubleshooter will suggest some settings change in your system to resolve the known audio issues.
Why can’t I hear any sound on Windows 11?
There can be various reasons why you are facing the no-sound issue on your Windows 11 device. Check out the first part of the above article to know about some of the common reasons for this issue on your device.
Why is there no audio device showing on my Sound settings page?
One of the reasons why you cannot find any audio device on your System Sound Settings page is that all the audio devices, including the default one, have been restricted to output any app or system sounds. You can check the “All sound devices” option under the “Advanced” section of the Sound Settings page and “Allow” the default device to play sounds for apps and Windows operations.
How to fix the Realtek audio driver on Windows 11?
If you find that there is a problem with your Realtek audio driver, you can either update or reinstall the driver on your system to try and fix the issue. we have provided the steps to do both in this article. Try them out and fix the driver issue on your Windows system.
Wrapping Up
So, this was all about the no-sound issue on Windows 11. The above solutions are tried and tested ways to fix the issue and get the audio back on Windows 11 devices. Hence, one of the listed fixes should work for you. However, if you are still facing the same no-audio issue on your device, we’d recommend you take your device to a nearby service center and get it checked for hardware damage.
